WHY ADDING BLEEDS IS IMPORTANT IN YOUR DESIGN FILE - AND HOW TO DO IT
When you’re making designs for print, make sure you include bleeds in your document. Bleeds ensure that your design goes all the way to the edge, so there are no white edges after trimming. Forgetting bleeds is the main reason print jobs hit roadblocks or need extra work.
WHAT ARE BLEEDS AND WHY ARE THEY IMPORTANT?
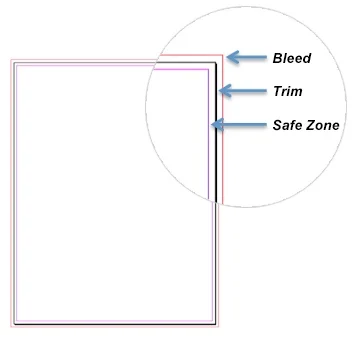
Bleeds are a way to make sure that anything in your design that goes to the edge of the page looks perfect after it’s trimmed. It means extending things like colors, lines, or pictures a bit beyond the edge of the page. This accounts for any small differences that might happen during printing and finishing, like cutting or folding. If you don’t use bleeds, you might end up with a tiny bit of white showing on the edge of your finished product.
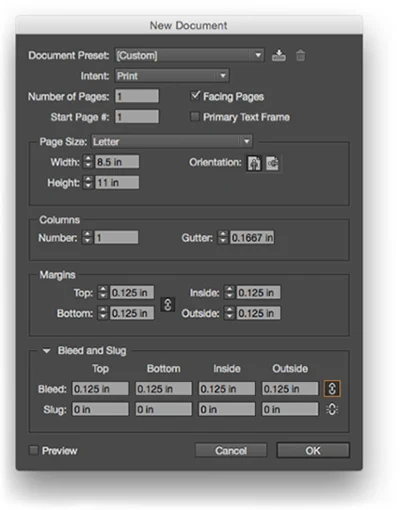
It’s standard to use a bleed of 0.125 inches on all sides.
Inside the trim line, there should be a safe zone of 0.125 to 0.25 inches where you don’t put any important stuff. You can set up these margins when you’re starting a new document.
The following example is specific to Adobe InDesign. While other software will differ, the basic principle is the same. The first step is always defining your new document. Set the page size to be the final trim size and then add margins and bleeds as settings.
Upon opening the page, the bleed, trim and margin (or safe zone) will be defined.
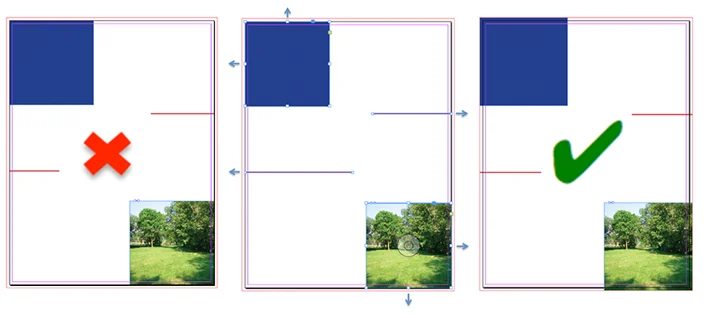
Below, in the left image, the elements like fills, strokes, and images don’t extend beyond the trim edge, which means they lack bleeds. To fix this, select the side anchor points or “handles” of each element and extend them to the bleed line, as shown in the center image. This ensures that all elements have bleeds. The right image displays the corrected version, where bleeds are set on all elements, making it ready for production.
Note: Images can pose additional challenge if there is no more image available to create the bleed. In those cases you may need to clone or enlarge the image, or decide to move it away from trim so it’s inside the safe zone.
Note: Bleed size of .125” is commonly used for standard-sized documents such as posters, business cards, brochures, and postcards. If you have a project that will require wide format printing or has special considerations, the bleeds and safety margins may need to be adjusted. Be sure to check with your printer before beginning your design.
HOW TO GENERATE A PDF WITH BLEEDS AND TRIMS
Once you’ve defined bleeds in your document, the next step is to ensure they carry through to your production-ready PDF.
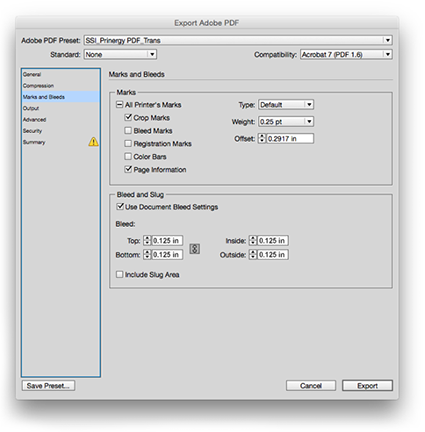
When exporting a high-quality print PDF from Adobe InDesign, make sure to include crop marks, page information, and bleeds of 0.125 inches. Additionally, set the offset to 0.2917 inches. This setup will generate a PDF with an even 0.5-inch space around all sides to accommodate trims during the printing process.
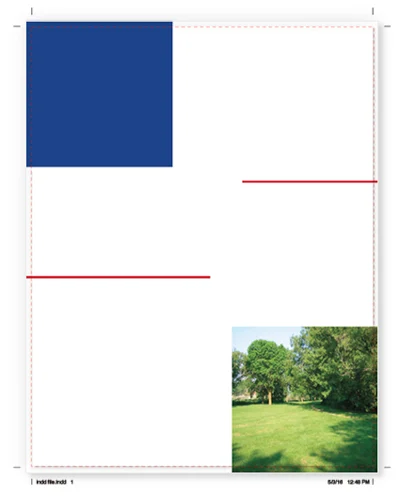
When exported, your PDF will look like this, with bleeds present and trim marks positioned appropriately.
With bleeds defined and a print-ready PDF, you’re all set to send your files to the printer. This minimizes the need for extra work and avoids delays in getting your print project to press.

